Make any search form to take a visitor to WooCommerce Search Results page instead of default WP Search Results page

Usually WooCommerce themes have their own search forms, from simple “input-submit” to advanced “input-filter1-filter2-…-checkbox1-submit” ones.

But sometimes shop owners meet a such problem: Their search form takes the visitor to WP search results page instead of WooCommerce rich search result one.

What is the difference between these two results page?

WP Search results page is simple – it shows all results (in most cases its UI has simple bloggy style, and yeah, bloggy view in WooCommerce search is not suitable UI)

WooCommerce Search Results page is more complitated – Usually it has a product category, parameter filter at sidebar, and its UI is not bloggy, it has normal grid which is important for product view.

woocommerce search results bloggy view

Why does it happen? It happens only when there is missing post_type parameter in url.

When search form submit takes you to shopsite.com/?s=productname  it will show you default WP search view. When search form submit takes you to shopsite.com/?s=productname&post_type=product it will show you correct UI. Normal shop search results page.

So we just need to add missing parameter to search forms, and everything will be ok.

To add this we need very simple script at the footer.

P.S. You may also want to have smart search suggestion box to the WooCommerce with this plugin.

Integrate Cloudflare SSL and WordPress Website

As we know Cloudflare is a very popular CDN and web security service with millions users. It has both free and paid features. But free features of Cloudflare are just great, not just for trial purpose. Its free features are really great and useful.

Some of free features are DNS, Firewall, Caching, Network Control, Analytics, Crypto(SSL).

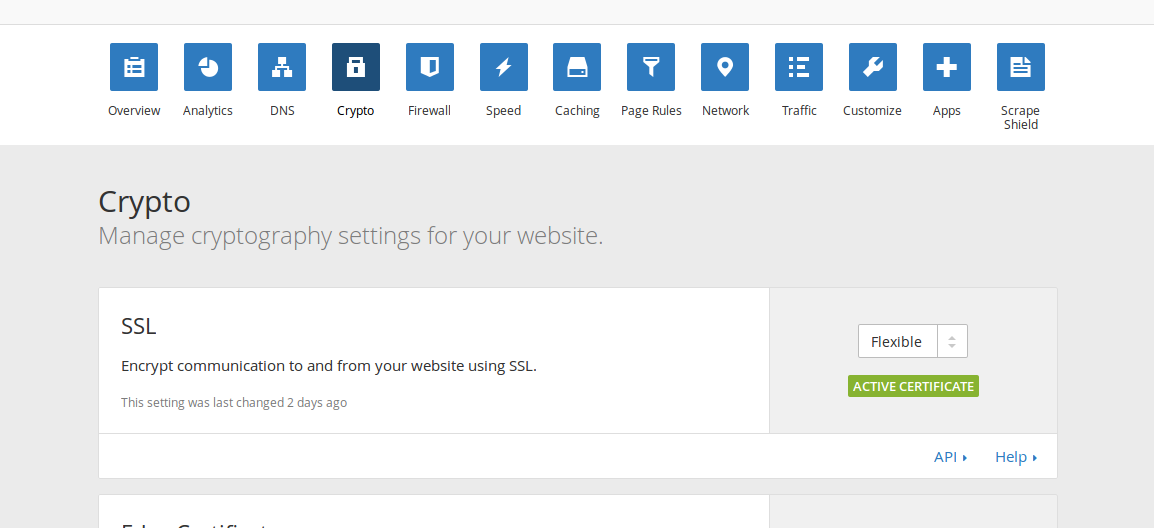
In this blog post i will write about Crypto-SSL option.
To install SSL(https) certificate in our website we need to buy SSL certificate first then install/configure the needed files in our Apache server.

But when we connect our website to Cloudflare DNS (it is so simple, just change domain’s nameservers to Cloudflare’s ones) it automatically gives our website SSL tunnel. Yes, without certificate installation, with just single toggle.

free wordpress ssl certificate with cloudflare

So, after changing nameservers to Cloudflare DNS-es and toggling Crypto->SSL feature to FLEXIBLE it is done, SSL for our website now works.

Now the only thing we should do is to prepare WordPress for HTTPS. Without this it just can’t work. Because it is configured to work with HTTP requests and its webserver Apache doesn’t have any configuration for 443 port, doesn’t have any certificate file in server filesystem. So there is no any information about SSL in serverside. Everything has been done in CloudFlare side.

Let’s simply solve it. After DNS changes are active (it usually takes up to 1 day) do these steps:

1. Go to wp-config.php, add these lines there before define(‘wp-debug’,’false’); line:

define('FORCE_SSL_ADMIN', true);
if (strpos($_SERVER['HTTP_X_FORWARDED_PROTO'], 'https') !== false) $_SERVER['HTTPS']='on';

This is for redirecting wp-admin requests to https and telling webserver to consider that the website works with https, not with http.

2. Go to wp-admin->settings and edit website addresses (change http:// to https:// ) You will be asked to login again.

3. Open .htaccess file and add this simple code there:

RewriteCond %{HTTP:X-Forwarded-Proto} !https
RewriteCond %{HTTPS} off
RewriteRule ^ https://%{HTTP_HOST}%{REQUEST_URI} [L,R=301]

This is for redirecting all http requests to https.

That’s all. Now your WordPress website will work only with HTTPS prefix (and it will show green bar in browsers’ address bars). And this has been done without installing SSL certificates at server side.

Scheduled Banners and Template Parts in WordPress

It is normal when we meet requirement to show/hide any section by time change. I mean when we meet a plugin or theme, it is possible to create a section which displays Content A for T1 time interval, and which diplays Content B for T2 time interval.

I give 3 common examples for such cases.

1. To switch banner image when day ends and night begins and vice-versa.
2. Weekend section – to show weekend special section. It appear when Saturday arrives, and disappears when Monday arrives.
3. Time interval specific section or Campaign section – It appears when the given campaign is active. (for example between 28-31th days of the month)

scheduled banner for wordpress

And all of these should be automatized. I mean, we should not to edit any code by arriving/ending of the given dates. All of these can be scheduled and automatized.

So let’s write sample codes for these 3 cases: (This codes don’t contain any part about managing datetime parameters via administrative interface. The codes are simple and do exactly the needed things)

1. Day-Night Banner Switching:

Weekend Banner Section:

Campaign Section for the given datetimes:

Of course, when we have global targeted project, these codes may not be enough, we may need additional Client-Time zone argument to set. To get it is not problem, we can get it through AJAX. We have related article about this topic, passing cookie via AJAX.

Getting the list of slow MySQL queries in WordPress

Saving MySQL queries is the part of WordPress Debug processes.
If the website works slowly, probably there are some problematic MySQL queries which can be from some plugin or your current theme. Without debugging we can’t know what happens under the hood.

If to define SAVEQUERIES constant in wp-config.php,  we can monitor all running queries in single process. To see that we can add simple code to our themes footer.php.  Here is how it looks like

wordpress mysql debug

But it might not be enough helpful if we can’t catch the problem in our testing process. We may not detect the problem in action, but the visitors still complain about it.  So what to do? Let’s keep SAVEQUERIES ON mode for some time and gather all slow queries for that period. At the end of this period we will be able to see all problematic queries and may be we will be able to solve them.

  1. Add this string to our wp-config.php : define( ‘SAVEQUERIES’, true );
  2. Add the code below to your theme’s footer.php. It will gather slow queries and save it to as WP Option data.
  3. After some time passed, check get_option(‘custom_mysql_debug’); value, it will show all slow MySQL queries in one string, one per line. Here is what it will look like.
    mysql-debug-result

HTML5 GeoLocation and WordPress

Let’s say that we have WordPress post objects with geolocation parameters.(lattitude, longitude). And we want to create geo filter and show relevant products to our visitors. For example if the visitor enters the website from New York, we want to show him only New York related products.

It is possible yeah. There are several ways. We can use 3rd party solutions (such as GeoPlugin ) in the website backend and detect where the visitor is. But to wait response from 3rd party service at backend – actually is not good idea.

WordPress - get the visitor location

So let’s try to do something at frontend side.

This piece of code detects the visitor geolocation, saves latitude + longitude as a cookie. Then it makes simple reload. It runs once when the visitor visits your website first time. And if you run this script before wp_head, the visitor will not feel redirect. So it will look smooth.

But what will happen at the backend side then? The only thing we need to do at backend side is to detect if the needed cookie exists and do some filters for that.

In this sample we have created sample filter which will show only those products which latitude is between 39-40, and longitude is between 47-49.

It is also possible to enrich javascript side of this solution and integrate it with Google Maps Geolocation API. In this case backend side will be more simple. As we will not have to create difficult lat-long meta query filter. We will only write one single CITY meta key, and that’s all.

Search Under The Hood in WordPress? Let’s Create Simple Plugin For This

Sometimes it is so important to find any string in plugin or theme directory files. Or to find where the given function is situated. You have to edit some plugin hook, but you don’t know in which file it is.

It is more needed when the project is not yours, the code is not yours (for own codes there are native OS feature, desktop softwares, IDE, server commands for that).

I am using my own solution for that.
If i start working on fixing some issue on client’s live website, first i install this plugin, then use it when it is needed. It is very helpful when you don’t know how client’s theme/plugin built.

WordPress Search Under The Hood - search inside plugins + themes

The plugin is lightweight and contains just one single file.

So, which steps we have followed to create this plugin:

  1. Create empty plugin and activate it. (here is how to do it)
  2. Register wp-admin submenu for the plugin’s action/settings page. (here is how to do it)
  3. Create simple html form to submit data.
  4. Write the needed backend code which does iterative file search in specified directory and displays the results.

Here is the plugin’s Github repository. WordPress Search Under The Hood

Adsense block inside WordPress posts – Create your own shortcode

With simple plugin we can create responsive adsense ad shortcode and put it anywhere inside our WordPress post.
Here is how to create it.

The usage is easy. Just put [responsive_adsense] anywhere inside your post, and responsive adsense ad will appear there.
Another shortcode in our code – [responsive_adsense_single] is for cases if you want those ads to appear only in single page (not in another pages where post content shown)

WordPress shortcode - preview
Here is how it is in editor
WordPress shortcode - editor view
Here is how it is in real web page

That’s all. Where to add this code? To your child theme functions.php file, or to you own custom plugin which you can easily create in 30 seconds.

WP-Admin “Open Sesame” or yet another magic way to protect your wp-admin from attacks

There are obviously a lot of ways to block our WordPress admin area login page from attackers, there are a lot of plugins for that.

But what if we want to build own logic – the secret key which changes itself daily, but we always know it, because we know its built logic.

For example what about if our secret key to wp-admin is today’s date + any custom string? Funny yeah? Or md5 encrypt of today’s date + any custom string – in this case nobody will recognize how this keys are generated.

Let’s write a little 2 functions which fulfill this solution.

In this sample our logic is ” secret key is current date + sesame” , so for example if today is 2016-10-10, our secret key would be 2016-10-10-sesame.
So yoursite.com/wp-admin?call=2016-10-10-sesame will work, yoursite.com/wp-admin will give 404 error.

not-found-page-wordpress

You can also build your own funny logic which changes keywords by the current date, last post name or any other dynamic data. Or to hide how your key is built you can use md5 encryption for that.

For that purpose just use $secretstring = md5(date(‘Y-m-d’) . ‘-sesame’) in the code above.

wordpress-login-screen